You can see the latest up-to-date version here
Intro
Brief explanation of some of the settings recommendations:
As first Origin Trial [FOT] will have a scale of realistically ~0.5% of the traffic - we recommend configurations that will help to reach this relatively small scale:
- Using a “Sponsorship” type of line items for fledge - because they have priority over the others, so this ~0.5% is easier targeted.
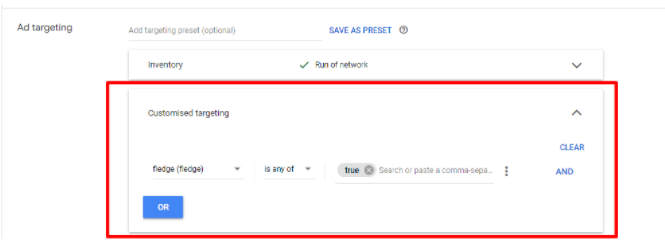
- Customised targeting in Ad targeting - if you wish to to reach only fledge based ads - you can leave it as only “true”, adding also “false” will allow to show fledge and non fledge ads - and the proportion should be available in the reporting if you enabled "Report on Values" during the setup of key-value pair.
First: key-value pair creation
A key-value pair needs to be created in Google Ad Manager along with proper Line Item targeting
Enter GAM/DFP page
- Enter GAM/DFP page: https://admanager.google.com/
'Inventory' tab
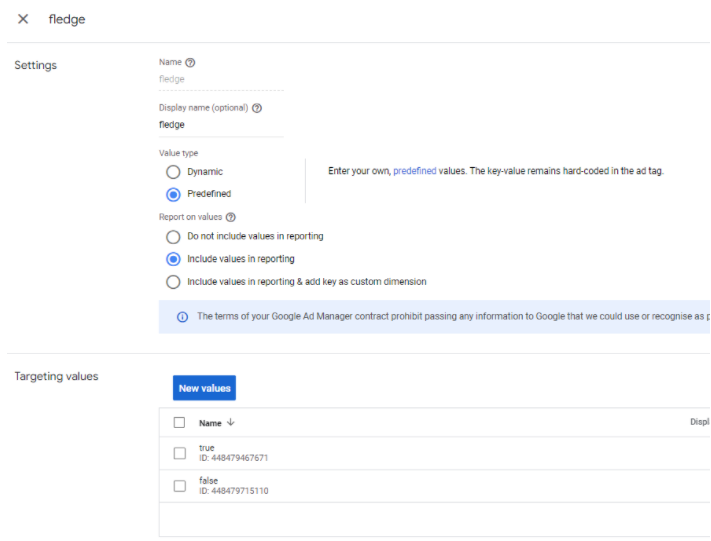
- Go to the 'Inventory' tab 'Key-values' and hit the "New key-value" button.
Create a key
-
Create a key, for example:
"fledge"and value"true"and"false", set value type to"predefined".
Include values in reporting
- You can also select “Include values in reporting” if you wish to query this value in reports page later.
Delivery > Orders > New Order
- Go to Delivery Orders, create a new order.
Create a new Line Item(s)
-
Create a new Line Item/Line Items [for test we've set it as
"Sponsorship type"]
- Set Customised targeting to previously created key - in the example it would be "fledge" and "is any of" "true"
- Add "Expected creatives" and "Delivery Settings" - as you wish.
- The rest could be set as desired too.
- Save.
Activate the order
- Go back to Delivery->Orders, find your newly created Order with Line Items and Activate the order - so its status changes to "Ready".
Actions needed on the page itself
What needs to be done on the page itself
If using GAM directly
We need this code to be implemented on page before running
googletag.enableServices():
OPTION 1
OPTION 1 - for publishers with one biggest domain or only integrating fledge for the main one.
How to generate your TOKEN_GOES_HERE:
Enter the url:https://developer.chrome.com/origintrials/#/trials/active
Click REGISTER button - next to
“Privacy Sandbox Relevance and Measurement”:
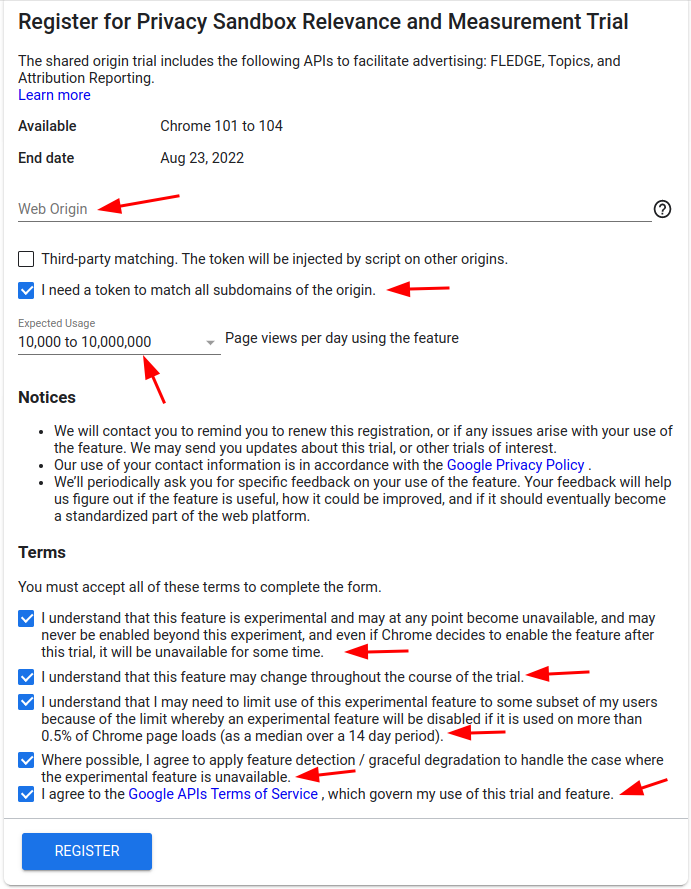
You will then receive this form:
-
the most important part is to add your main domain like for example:
rtbhouse.com in the
“Web Origin”, - check the option that will match all the subdomains of the main one,
- give all consents necessary.
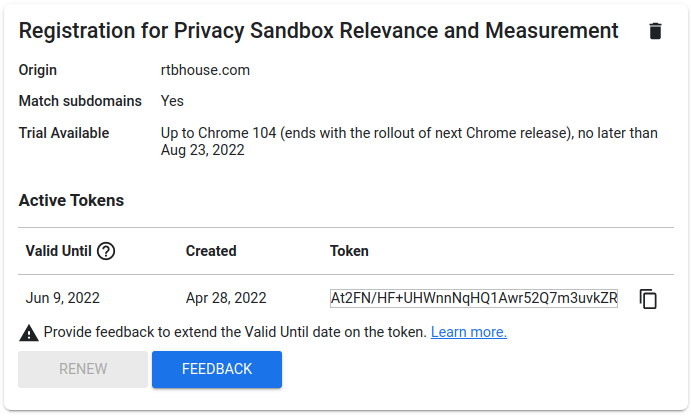
You will then see this pop up, with the code of the generated token to
replace the 'TOKEN_GOES_HERE' section in our script -
omit the ' ' though.
OPTION 2
OPTION 2 - for ad networks with multiple domains.
The most important thing is to place it before “googletag.enableServices();” call, for example:
Then it is possible to check if key-value pairs are being sent:
- enter a page with an ad, where you are expecting the auctions including fledge to be held,
-
-
one way of progressing is to is to add to the end of your URL
"
?google_force_console" - other way is to:
-
-
open debugging console
[press F12 in Chrome]switch to javascript Console[Console tab] - enter '
googletag.openConsole()'
-
open debugging console
-
one way of progressing is to is to add to the end of your URL
"
- look for a result, we expect to see:
-
- console showing up (not an exception/error instead)
-
after clicking
"Open Targeting Info"we should see information about previously set key so:
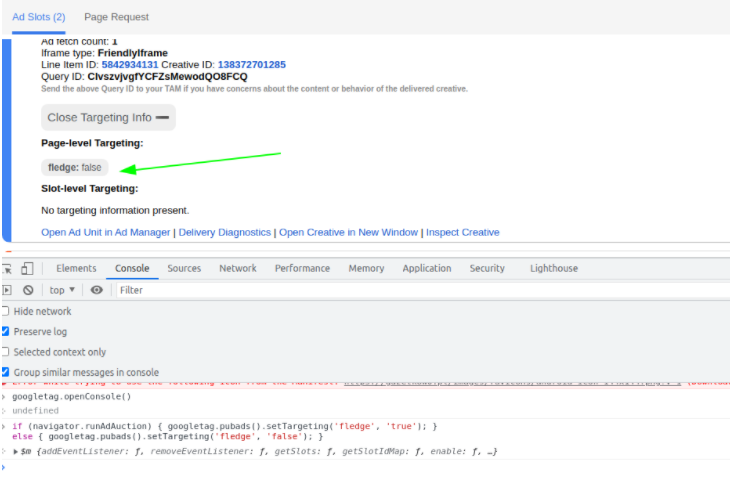
It is all - if you can see the fledge key - you will be able to see fledge in your reporting and also configure fledge only /non-fledge only targeting on your line items as you prefer.
If using GTM
Before starting:
Be sure you are not rendering the chosen ad slot directly on the webpage through Google Publisher Tags (GPT). Such a scenario will impose concurrency between GPT and GTM, thus, FLEDGE setup will most likely fail.
Custom tag template creation
The first step will be to generate a custom tag template - this will allow you to write custom tag code that can be reused later.
In order to do it, enter your GTM account, go to your
Workspace > Templates and click on “New”

You can then specify name and description for the template:
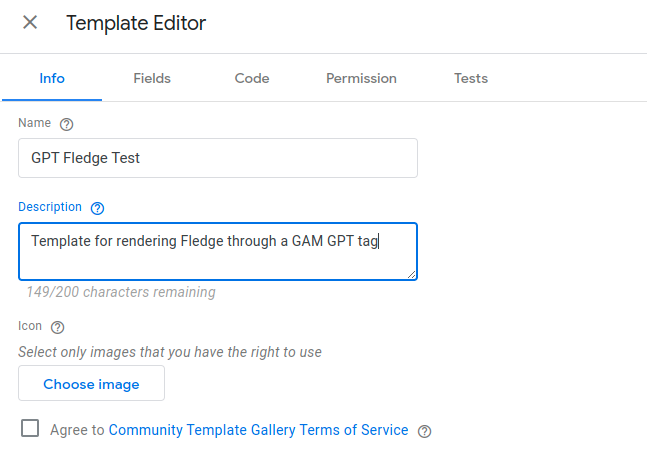
You will also want to specify some custom fields to be used during final tag creation:
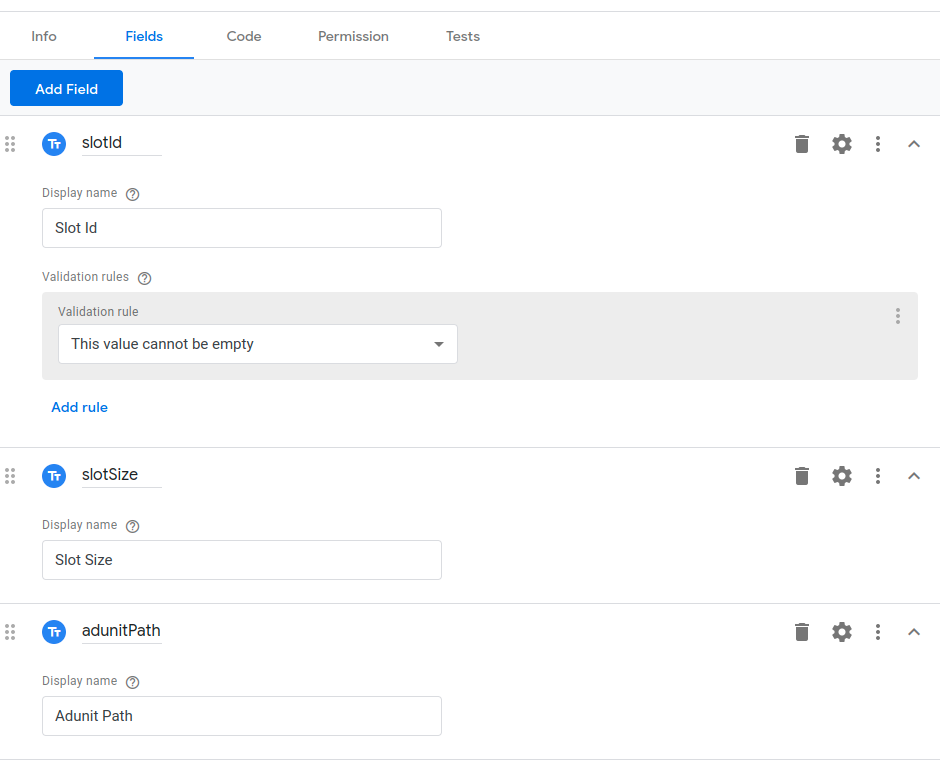
Note:
Slot id: the div id in which the ad will be rendered
Slot size: the supported ad size in the format
[width]x[height]
Next, paste the following script on “Code” tab:
On “Permission” tab, you should also add parameters as
follows:
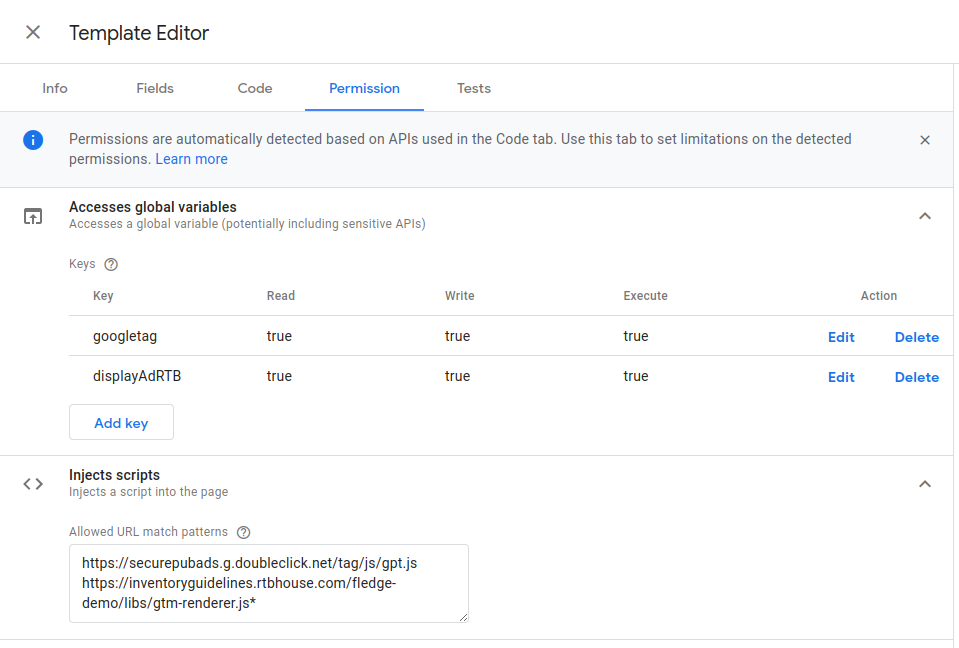
This will allow the template to work with googletag (GPT) and displayAdRTB (RTB House) functions. Notice that corresponding script URLs are also set as allowed.
You can then finally hit “Save”
Tag creation
As a final step, you will need to create and publish the tag responsible for serving the ad.
Navigate to “Tags” and click on “New”

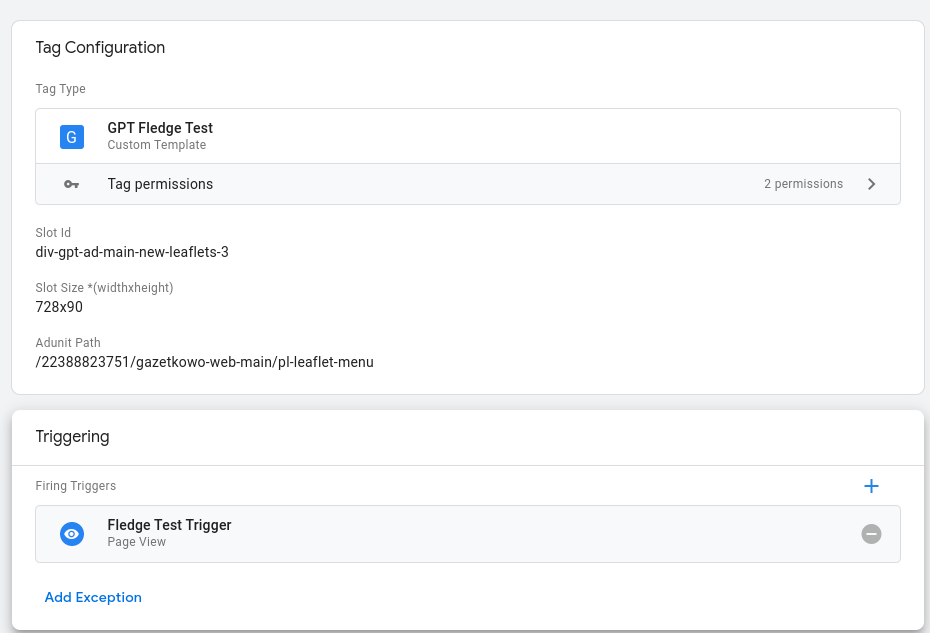
On tag configuration, choose the previously created template:

You will also need to specify a value for Slot ID,
Slot SIze and Adunit Path.
Then, on “Triggering” specify a trigger of your
preference. In this case a custom trigger is being used and activated
only if loaded URL contains a specific test parameter:
FAQ
-
29.03.2022: Chrome Dev Version and Chrome Canary Version on Windows - not working - not loading any pages inserted into the address bar.
Solution: Try switching off one of those options in Chrome Settings-Other Google Services:
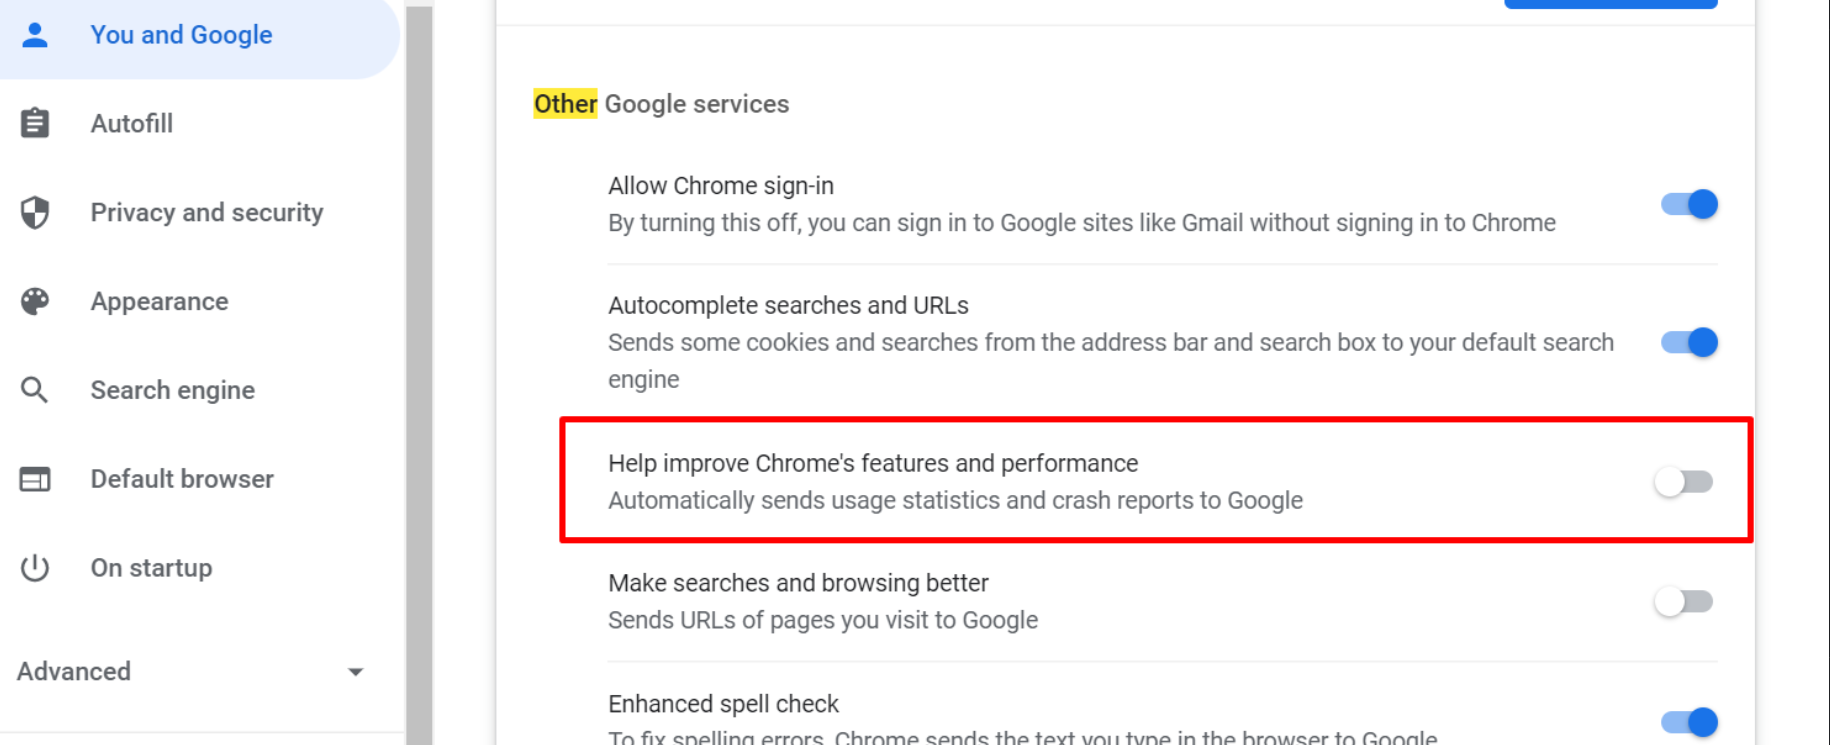
- Help improve Chrome's features and performance
- Make searches and browsing better
- Enhanced spell check
To be continued...
FLEDGE-Demo
RTB House FLEDGE system - demo
About
-
This doc describes how to see RTB House's FLEDGE system in action -
from
joinAdInterestGroup, throughrunAdAuction, to seeing the ad rendered in a Fenced Frame.
Instructions
- Below described steps will still be required if you are not in the group of ~0.5% of users with new Crome Browser version(stable), supporting Fledge.
- A fresh dev-version of chromium is required [Important note: Not a Chrome Canary version]. You can download it here
-
Start up chrome, and
pass a couple flags:
                WINDOWS EXAMPLE


                  "C:\Program Files\Google\Chrome Dev\Application\chrome.exe"


                  --enable-features=InterestGroupStorage, AllowURNsInIframes,
                  PrivacySandboxAdsAPIs
                LINUX EXAMPLE


                  ./chrome-linux/chrome --user-data-dir=./profile123


                  --enable-features=InterestGroupStorage, AllowURNsInIframes,
                  PrivacySandboxAdsAPIs

-
Visit one of the supported advertisers, for example
https://justjoin.it or
https://mediamarkt.pl/ Explore
the site to be added to an interest group. (You can filter network
events by "
fledge" in chrome dev tools to confirm you've been added to an IG.) - Visit https://fledge-publisher.creativecdn.net/v1/publisherWithContext.html, and click the desired ad size to trigger an auction and see the ad.
- Visit a webpage that already has your line item active [from the instruction received with previous communication in pdf] for Fledge support and where our emission codes are already integrated.
Authentication
-
Until the start of Fledge Origin Trials - setting up flags may be a
necessity for our emission code to work properly for testing
purposes -
REMEBER, THAT ONLY ~0.5% OF USERS WITH NEW VERSIONS OF CHROME
BROWSERS TAKE PART NATURALLY.
- RTB House removed the necessity of ‘secret code’, when Chrome did start First Origin Trials - every User with a browser that supports Fledge and is included in Origin Trials will be able to see ads served using Fledge - other users still will need to add flags as showed at the top of the “Instructions” section.
Emission code example
"pub-id" - to be changed to the RTB House
            generated and provided id.
Changelog
| Version | Date | Comments | Version Link |
|---|---|---|---|
| 2.1 | 23.08.2022 | Emmission code updated | Latest version |
| 2.0 | 02.06.2022 | Emmission code updated, changelog added, styles improved | See this version |
| 1.0 | 30.05.2022 | Document created | See this version |
